
Help
Help is always available online or by email
Installation
The file you have downloaded is the installation file. When you run it the application will be installed on your computer. You will have the ability to change the default location and if you want a desktop icon.
The program will be located in C:\Program Files (x86)\CSSCheck\CSSCheck.exe
When this has finished you will be given the opportunity to start the program.
Note: If you have the Security Option The first time you run the program you will get a notification that there are No Users for this application. Do you want to add a user? Yes, you do.
On the next screen you will enter your First Name, Surname (Last Name), and a Password.
Note: The password you enter will also be your first Login Name, you can change the Password after you have logged in.
Note: The password you enter will also be your first Login Name, you can change the Password after you have logged in.
You can accept the default prompts as you are entering the Supervisor User. Don't worry you will have complete access to everything, even though it says 'No Access'
Multiple Users
If you have more than one User on more than one Computer, the first step is to insure all of your users are accessing the same Application and Set of Data files. During the installation you need to select a Shared Network Location. If you are installing the application on the server from which the application will be run, select a drive and directory on the local server where you want to place the application.
Note: the default installation directory is C:\Program Files(86)\CssCheck This is a difficult directory to Share. We suggest you select a different location on the server, such as C:\CSSCheck
If your only going to install on one Computer and have one or more users, that is, not sharing across a network, then you can accept the default location.
Select a location, if you want to change the default location, by selecting the Browse Button and either typing in the new drive and directory or navigate to the correct location. Then click the Next Button. You will then have to share the folder so users of the application can access the directory.
If you are going to install the application onto a different computer, click the Browse button and either type or navigate to the correct location, then share the folder on the server.
NOTE: You must first map a drive on your local computer to the share on the server where you want to install the application
For example: X:\sharename\directory_name
If the directory_name does not exist it will be created
Note: You can name the directory on the shared location anything you want to, for example...CSSCheck we suggest you do not use the default location on the network as it may make it easier to receive updates.
Quick Start


Although all of our programs are simple to use, there is always a learning curve when using a new program. Some of the terminology is different, location of items may not be in places where you expect, etc..
When you start this application you are presented with a blank screen, this can be a little daunting at first.
Across the top you will see the customary File, Edit, Browse, Window, Reports, and Help choices.
Browse is probably not something you are used to seeing. This selection allows you to 'browse' a listing of all the records (enteries) in your file. This is done to allow you to see all the items (records) you have in a particular file, or table.
You are probably used to using File/Open to open a particular file, however in database applications you need to be able to 'see' the database prior to making any changes. We choose to 'Browse' the entire database to enable you to visualize the records you have. This makes it easier to find and edit your records.
At the bottom of the screen once you have selected Browse you will see
View will allow you to view the highlighted record, any changes you make will NOT be saved
Insert adds a new record
Change will allow you to make changes to the highlighted record
Delete will delete the highlighted record. We recommend you NEVER do this.
Entering Records
Entering records is a very simple process because some fields are filled from a Drop Down list. You can simply type the first letter of the Category, for example in the Category drop down list, until you reach the Category you want.
Dates assume the year is the current one. For the date of 01/01/2019 you can simply enter the mmdd of the current year. In this example you would enter 0101 hit TAB or ENTER and the application will fill in 01/01/2019.
For July 1, 2018 you would enter 070118.
Text fields use automatic Capitalization.
Some fields when entering records are Required Fields, they are indicitated by BLUE
With the ability to Print Checks, you need to be able to select the correct record to print. This required the addition of the Record ID field in both the Browse and Add/Edit bank records. Although you can now change the Record ID Field when adding a record DON'T!
The only exception if you have imported records and the ID Field is blank.
See Troubleshooting to correct this problem
Backup


We don't include a Backup procedure because there are several backup programs available to backup and restore your data. In our opinion you should already have one.
With that said, while learning the application and doing things like Mass Update you may want to make backup copies of your files just in case something goes wrong.
With v8.1.3 we have added a simple way to backup your CHECKING.TPS file and restore it if necessary.
In the folder (directory) where the application is installed. The default directory is C:\CSSChecking.
There are several files with the extension of .tps These are your data files
In the Main Menu select File/Backup Checking
The First time you run Backup Checking you will receive a prompt asking if BACKUP is a Directory or not
It IS a Directory so type D on your keyboard
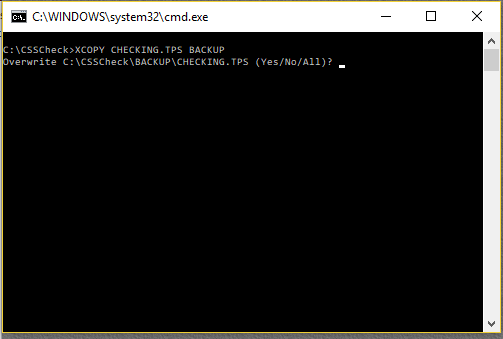
a Windows Command file (batch file) will run and Prompt you to confirm you want to copy the file
Type Y on your keyboard to copy the file, type N to Not copy the file.
Typing Y will copy your file to a directory C:\CSSChecking\BACKUP
An alternative way...
In Windows Explorer highlight CHECKING.TPS and press Ctrl+C to copy the file, then press Ctrl+V to paste the file.
A copy will be made and called CHECKING-Copy.tps
To Restore the file, simply delete the original CHECKING.TPS file and rename CHECKING -Copy.tps to CHECKING.tps